In case readers are unfamiliar, Breakout is a very simple game that involves the player bouncing a ball off of a user-controlled paddle in an attempt to destroy all blocks in the current level. If the ball falls through the bottom of the level, the player loses and the game is over, though in these versions it will simply be reset (i.e. ball set to initial position, all destroyed blocks are recreated, etc.):
Version 1: Procedural-Oriented
*Warning - Extremely Messy Code Ahead*My first stab at creating Breakout revolved around procedurally generating the blocks, paddle, and ball, alongside the relevant collision logic, rather than storing that information/functionality in separate game objects (as I did later). In addition to this, I utilized OpenGL's deprecated fixed-function pipeline to make all of the necessary vertices and apply the correct texture coordinates rather than more modern techniques, both because I wanted to compare the different approaches and because I didn't know better at the time :) One last point I would like to make is that while the code I am about to show is quite messy and convoluted, I think it is instructive to juxtapose it with the much more refined (but still far from perfect) OO version later on, since doing so should give the reader a rough idea of how my coding skills are developing with practice. With those formalities out of way, let's jump into the actual project.
Included Libraries/Global Variables:
For both iterations of the Breakout game I decided to use GLUT and GLEW to handle window creation/resizing, keyboard input, etc. along with the stb single header library for loading images and converting them to textures:#include "pch.h" #include <iostream> #include <GL/glew.h> #include <glut.h> #define STB_IMAGE_IMPLEMENTATION #include "stb_image.h" #include <thread> #include <vector> #include <Windows.h> #define FPS 30 using namespace std; using namespace std::chrono;
float windowWidth = 600, windowHeight = 600;
bool start = false;
float globalRectPosX = 4.0f;
float localRectPosX;
float rectDeltaMove = 0;
float radius = 0.15f;
vector<float> circPos = { globalRectPosX + 1.0f, radius + 1.2f };
vector<float> circDeltaMove = {0, 0};
vector<float> numCollidedBricks;
float numBlocksX = 10;
float deltaNumBlocksX = 10 / numBlocksX;
float numBlocksY = 10;
float deltaNumBlocksY = 10 / numBlocksY;
unsigned int verticalSpace = 5;
unsigned int numRemainingBlocks = numBlocksX * verticalSpace;
vector<int> indices;
vector<bool> activeStatus;
vector<vector<float> > compass{ vector<float> {0, 1}, vector<float> {1, 0}, vector<float> {0, -1}, vector<float> {-1, 0} };
vector<float> ballDirection;
unsigned int texturePlatform, textureBall, textureBlocks, textureBackground;
Main Loop:
The actual game window needs to be created. GLUT makes this simple enough to do:int main(int argc, char **argv) { srand(time(NULL)); glutInit(&argc, argv); glutInitDisplayMode(GLUT_DOUBLE | GLUT_RGBA); glutInitWindowPosition(100, 100); glutInitWindowSize(windowWidth, windowHeight); glutCreateWindow("Breakout"); glEnable(GL_BLEND); glBlendFunc(GL_SRC_ALPHA, GL_ONE_MINUS_SRC_ALPHA); loadTexture(); glutDisplayFunc(renderScene); glutReshapeFunc(changeSize); glutTimerFunc(1000 / FPS, idle, 0); glutMainLoop(); return 1; }
Changing the Window Size:
void changeSize(int w1, int h1)
{
 glMatrixMode(GL_PROJECTION);
 glLoadIdentity();
 glViewport(0, 0, w1, h1);
 if (w1 >= windowWidth && h1 >= windowHeight) gluOrtho2D(0, 10 / windowWidth * w1, 0, 10 / windowHeight * h1);
 else gluOrtho2D(0, 10, 0, 10);
 glMatrixMode(GL_MODELVIEW);
}
Loading Textures:
Texture loading is done with the following function:
void loadTexture()
{
 glewInit();
 stbi_set_flip_vertically_on_load(true);
 //paddle texture
 glGenTextures(1, &texturePlatform);
 glBindTexture(GL_TEXTURE_2D, texturePlatform);

 //set the texture wrapping and filtering options on the currently-bound texture object
 glTexParameteri(GL_TEXTURE_2D, GL_TEXTURE_WRAP_S, GL_REPEAT);
 glTexParameteri(GL_TEXTURE_2D, GL_TEXTURE_WRAP_T, GL_REPEAT);
 glTexParameteri(GL_TEXTURE_2D, GL_TEXTURE_MIN_FILTER, GL_LINEAR);
 glTexParameteri(GL_TEXTURE_2D, GL_TEXTURE_MAG_FILTER, GL_LINEAR);

 //load image, create texture, and generate mipmaps
 int width, height, nrChannels;
 unsigned char* data = stbi_load("paddle.png", &width, &height, &nrChannels, 0);
 if (data)
 {
  glTexImage2D(GL_TEXTURE_2D, 0, GL_RGBA, width, height, 0, GL_RGBA, GL_UNSIGNED_BYTE, data);
  glGenerateMipmap(GL_TEXTURE_2D);
 }
 else
 {
  std::cout << "Failed to load texture" << std::endl;
 }
 stbi_image_free(data);

 //ball texture
 glGenTextures(1, &textureBall);
 glBindTexture(GL_TEXTURE_2D, textureBall);

 glTexParameteri(GL_TEXTURE_2D, GL_TEXTURE_WRAP_S, GL_REPEAT);
 glTexParameteri(GL_TEXTURE_2D, GL_TEXTURE_WRAP_T, GL_REPEAT);
 glTexParameteri(GL_TEXTURE_2D, GL_TEXTURE_MIN_FILTER, GL_LINEAR);
 glTexParameteri(GL_TEXTURE_2D, GL_TEXTURE_MAG_FILTER, GL_LINEAR);

 data = stbi_load("awesomeface.png", &width, &height, &nrChannels, 0);
 if (data)
 {
  glTexImage2D(GL_TEXTURE_2D, 0, GL_RGB, width, height, 0, GL_RGBA, GL_UNSIGNED_BYTE, data);
  glGenerateMipmap(GL_TEXTURE_2D);
 }
 else
 {
  std::cout << "Failed to load texture" << std::endl;
 }
 stbi_image_free(data);

 //block texture
 glGenTextures(1, &textureBlocks);
 glBindTexture(GL_TEXTURE_2D, textureBlocks);

 glTexParameteri(GL_TEXTURE_2D, GL_TEXTURE_WRAP_S, GL_REPEAT);
 glTexParameteri(GL_TEXTURE_2D, GL_TEXTURE_WRAP_T, GL_REPEAT);
 glTexParameteri(GL_TEXTURE_2D, GL_TEXTURE_MIN_FILTER, GL_LINEAR);
 glTexParameteri(GL_TEXTURE_2D, GL_TEXTURE_MAG_FILTER, GL_LINEAR);

 data = stbi_load("block.png", &width, &height, &nrChannels, 0);
 if (data)
 {
  glTexImage2D(GL_TEXTURE_2D, 0, GL_RGB, width, height, 0, GL_RGB, GL_UNSIGNED_BYTE, data);
  glGenerateMipmap(GL_TEXTURE_2D);
 }
 else
 {
  std::cout << "Failed to load texture" << std::endl;
 }
 stbi_image_free(data);

 //background texture
 glGenTextures(1, &textureBackground);
 glBindTexture(GL_TEXTURE_2D, textureBackground);

 glTexParameteri(GL_TEXTURE_2D, GL_TEXTURE_WRAP_S, GL_REPEAT);
 glTexParameteri(GL_TEXTURE_2D, GL_TEXTURE_WRAP_T, GL_REPEAT);
 glTexParameteri(GL_TEXTURE_2D, GL_TEXTURE_MIN_FILTER, GL_LINEAR);
 glTexParameteri(GL_TEXTURE_2D, GL_TEXTURE_MAG_FILTER, GL_LINEAR);

 data = stbi_load("background.jpg", &width, &height, &nrChannels, 0);
 if (data)
 {
  glTexImage2D(GL_TEXTURE_2D, 0, GL_RGB, width, height, 0, GL_RGB, GL_UNSIGNED_BYTE, data);
  glGenerateMipmap(GL_TEXTURE_2D);
 }
 else
 {
  std::cout << "Failed to load texture" << std::endl;
 }
 stbi_image_free(data);
}
This entire process could be streamlined by creating a separate texture-loading manager that handled the repetitive task, and only having to call some sort of loadTexture function a few times in the game code rather than manually generating/configuring every single texture, a feature that later finds its way into the game's OO version.
Now we will take a look at the renderScene function, which draws all objects on-screen based on user input, collision logic, etc.
Rendering the Scene:
void renderScene(void)
{
 glClear(GL_COLOR_BUFFER_BIT);
 drawBackground();
 drawPlatform();
 if (rectDeltaMove != 0) computePlatformPosition(rectDeltaMove);
 drawBlocks(numBlocksX, numBlocksY, verticalSpace);
 drawCircle(radius);
 for (int i = 0; i < 10; ++i)
     if (circDeltaMove != vector<float> {0, 0} && i < 10) computeCirclePosition(circDeltaMove); winGame();
 glutSwapBuffers();
}
Draw the Background:
First up is the drawBackground() function, which simply creates a background-textured quad:void drawBackground() { glEnable(GL_TEXTURE_2D); glBindTexture(GL_TEXTURE_2D, textureBackground); glBegin(GL_QUADS); glTexCoord2f(0, 0); glVertex2f(0, 0); glTexCoord2f(1, 0); glVertex2f(10, 0); glTexCoord2f(1, 1); glVertex2f(10, 10); glTexCoord2f(0, 1); glVertex2f(0, 10); glEnd(); glDisable(GL_TEXTURE_2D); }
Draw the Platform/Paddle:
Next up after drawing the background is rendering the player paddle:void drawPlatform() { glEnable(GL_TEXTURE_2D); glBindTexture(GL_TEXTURE_2D, texturePlatform); glBegin(GL_QUADS); glTexCoord2f(0, 0); glVertex2f(globalRectPosX, 1); glTexCoord2f(1, 0); glVertex2f(globalRectPosX + 2, 1); glTexCoord2f(1, 1); glVertex2f(globalRectPosX + 2, 1.2f); glTexCoord2f(0, 1); glVertex2f(globalRectPosX, 1.2f); glEnd(); glDisable(GL_TEXTURE_2D); }
Compute the Platform Position:
Paddle movement calculations are performed by the following function:if (rectDeltaMove != 0) computePlatformPosition(rectDeltaMove);
void computePlatformPosition(float rectDeltaMove)
{
 if (globalRectPosX > 0 && globalRectPosX < 8.0f) globalRectPosX += rectDeltaMove;
 if (globalRectPosX >= 8.0f && GLUT_KEY_RIGHT) globalRectPosX += 0;
 if (globalRectPosX >= 8.0f && GLUT_KEY_LEFT) globalRectPosX -= rectDeltaMove;
 if (globalRectPosX <= 0 && GLUT_KEY_LEFT) globalRectPosX += 0;
 if (globalRectPosX <= 0 && GLUT_KEY_RIGHT) globalRectPosX -= rectDeltaMove;
}
Draw the Bricks:
With the background and paddle finally being rendered, the next objects that need to be addressed are the blocks themselves. The first iteration of the relevant code is as follows:void drawBlocks(float numBlocksX, float numBlocksY, int verticalSpace) { if (numBlocksX != 0 && numBlocksY != 0) { int ii = 0; for (float i = 10 - verticalSpace * deltaNumBlocksY; i < 10; i += deltaNumBlocksY) { for (float j = 0; j < 10; j += deltaNumBlocksX) { ++ii; indices.push_back(ii); activeStatus.push_back(ii); if (ii % 3 == 0) glColor3f(1, 0, 0); else if (ii % 3 == 1) glColor3f(0, 1, 0); else if (ii % 3 == 2) glColor3f(0, 0, 1); if (activeStatus[ii] == true) { glEnable(GL_TEXTURE_2D); glBindTexture(GL_TEXTURE_2D, textureBlocks); glBegin(GL_QUADS); glTexCoord2f(0, 0); glVertex2f(j, i); glTexCoord2f(1, 0); glVertex2f(j + 10 / numBlocksX, i); glTexCoord2f(1, 1); glVertex2f(j + 10 / numBlocksX, i + 10 / numBlocksY); glTexCoord2f(0, 1); glVertex2f(j, i + 10 / numBlocksY); glEnd(); glDisable(GL_TEXTURE_2D); } else { glRectf(0, 0, 0, 0); } } } } }
One (relatively) minor issue with the above code block is that altering the number of blocks along the x- and y-axes also changes the color patterns. Compare what the game level looks like when the block counts along each axis are set at 8, 9, and 10, respectively:


void drawBlocks(float numBlocksX, float numBlocksY, int verticalSpace)
{
 if (numBlocksX != 0 && numBlocksY != 0)
 {
  int hh = 9 - verticalSpace;
  int ii = 0;
  int jj = -1;
  int kk = 0;
  int ll = 1;
  int mm = 2;
  for (float i = 10 - (verticalSpace * deltaNumBlocksY); i < 10; i += deltaNumBlocksY)
  {
   ++hh;
   for (float j = 0; j < 10; j += deltaNumBlocksX)
   {
    ++ii;
    if (jj <= (int)numBlocksX - 2) ++jj;
    else jj = 0;
    indices.push_back(ii);
    activeStatus.push_back(ii);

    if ((int)numBlocksX % 3 == 0)
    {
     if (kk < 3)
     {
      if (ii % 3 == kk) glColor3f(1, 0, 0);
     }

     else kk = 0;

     if (ll < 3)
     {
      if (ii % 3 == ll) glColor3f(0, 1, 0);
     }

     else ll = 0;

     if (mm < 3)
     {
      if (ii % 3 == mm) glColor3f(0, 0, 1);
     }

     else mm = 0;
    }

    else if ((int)numBlocksX % 3 == 1)
    {
     int ii = (10 - jj) + hh * numBlocksX;
     if (ii % 3 == 0) glColor3f(0, 1, 0);
     else if (ii % 3 == 1) glColor3f(1, 0, 0);
     else if (ii % 3 == 2) glColor3f(0, 0, 1);
    }

    else if ((int)numBlocksX % 3 == 2)
    {
     if (ii % 3 == 0) glColor3f(1, 0, 0);
     else if (ii % 3 == 1) glColor3f(0, 1, 0);
     else if (ii % 3 == 2) glColor3f(0, 0, 1);
    }

    if (activeStatus[ii] == true)
    {
     glEnable(GL_TEXTURE_2D);
     glBindTexture(GL_TEXTURE_2D, textureBlocks);
     glBegin(GL_QUADS);
     glTexCoord2f(0, 0);
     glVertex2f(j, i);
     glTexCoord2f(1, 0);
     glVertex2f(j + 10 / numBlocksX, i);
     glTexCoord2f(1, 1);
     glVertex2f(j + 10 / numBlocksX, i + 10 / numBlocksY);
     glTexCoord2f(0, 1);
     glVertex2f(j, i + 10 / numBlocksY);
     glEnd();
     glDisable(GL_TEXTURE_2D);
    }
    else
    {
     glRectf(0, 0, 0, 0);
    }
   }
   ++kk;
   ++ll;
   ++mm;
  }
 }
}
Draw the Ball:
The final object that needs to be rendered is the ball. In this version of Breakout the circle will be approximated with a 360-sided polygon like so:
void drawCircle(float radius)
{
 glEnable(GL_TEXTURE_2D);
 glBindTexture(GL_TEXTURE_2D, textureBall);
 glBegin(GL_POLYGON);
 for (float i = 0; i < 360; ++i)
 {
  float angle = 3.1415926535 * i / 180;
  float x = radius * cos(angle);
  float y = radius * sin(angle);
  glColor3f(1, 1, 1);
  glTexCoord2f(0.5f * (cos(angle) + 1), 0.5f * (sin(angle) + 1));
  glVertex2f(x + circPos.front(), y + circPos.back());
 }
 glEnd();
 glDisable(GL_TEXTURE_2D);
}
Computing the Circle Position:
Now we are getting to the calculative meat of the game. This is the function that handles all ball-game interactions, which describes how the ball reacts to bouncing off of the level walls, the player paddle, and the bricks themselves. It does so by modifying a vector called circDeltaMove based on how the ball acts within the game, before being added to the circle's position to move it throughout the level. Here is the entire method:
void computeCirclePosition(vector<float>& circDeltaMove)
{
 //ball-level wall interactions
 if (circPos.front() <= radius || circPos.front() >= 10 - radius)
 {
  circDeltaMove.front() *= -1;
 }

 if (circPos.back() >= 10 - radius)
 {
  circDeltaMove.back() *= -1;
 }

 else if (circPos.back() < -radius)
 {
  resetGameUponDeath();
 }

 //ball-player paddle interactions
 if (start == true && circPos.front() >= globalRectPosX && circPos.front() <= globalRectPosX + 2 && circPos.back() > 1 - radius && circPos.back() < 1.2f + radius)
 {
  if (circPos.front() - globalRectPosX >= 1)
  {
   localRectPosX = circPos.front() - globalRectPosX - 1;
   circDeltaMove.front() = 0.02f * localRectPosX / sqrtf(1.25f * localRectPosX * localRectPosX - localRectPosX + 1);
   circDeltaMove.back() = 0.02f * (1 - 0.5f * localRectPosX) / sqrtf(1.25f * localRectPosX * localRectPosX - localRectPosX + 1);
  }

  else if (circPos.front() - globalRectPosX < 1)
  {
   localRectPosX = (circPos.front() - globalRectPosX) - 1;
   circDeltaMove.front() = 0.02f * localRectPosX / sqrtf(1.25f * localRectPosX * localRectPosX + localRectPosX + 1);
   circDeltaMove.back() = 0.02f * (1 + 0.5f * localRectPosX) / sqrtf(1.25f * localRectPosX * localRectPosX + localRectPosX + 1);
  }
  numCollidedBricks.clear();
 }

 //ball-brick interactions
 checkCollision(numBlocksX, numBlocksY, verticalSpace);

 //alter ball velocity/multiple-brick collision logic
 if (numCollidedBricks.size() > 2) numCollidedBricks.clear();
 circPos.front() += circDeltaMove.front();
 circPos.back() += circDeltaMove.back();
}
void computeCirclePosition(vector<float>& circDeltaMove)
{
 //ball-level wall interactions
 if (circPos.front() <= radius || circPos.front() >= 10 - radius)
 {
  circDeltaMove.front() *= -1;
 }

 if (circPos.back() >= 10 - radius)
 {
  circDeltaMove.back() *= -1;
 }

 else if (circPos.back() < -radius)
 {
  resetGameUponDeath();
 }
    [...]
}
void resetGameUponDeath()
{
 int ii = 0;
 globalRectPosX = 4.0f;
 rectDeltaMove = 0;
 circPos = { globalRectPosX + 1, radius + 1.2f };
 circDeltaMove = { 0, 0 };
 for (float i = 10 - verticalSpace * deltaNumBlocksY; i < 10; i += deltaNumBlocksY)
 {
  for (float j = 0; j < 10; j += deltaNumBlocksX)
  {
   ++ii;
   activeStatus[ii] = true;
  }
 }
 numCollidedBricks.clear();
 start = false;
 numRemainingBlocks = numBlocksX * verticalSpace;
}
The next portion of the circle computation code handles ball-paddle collision. Unlike the walls, where a hit simply inverts a portion of the ball velocity, the circle's velocity changes depending on where exactly it collides with the paddle - collisions farther away from the platform's center-point will increase the ball's x-velocity and reduce the y-velocity, and vice versa the closer to the middle it lands:
void computeCirclePosition(vector<float>& circDeltaMove)
{
        [...]
 //ball-player paddle interactions
 if (start == true && circPos.front() >= globalRectPosX && circPos.front() <= globalRectPosX + 2 && circPos.back() > 1 - radius && circPos.back() < 1.2f + radius)
 {
  if (circPos.front() - globalRectPosX >= 1)
  {
   localRectPosX = circPos.front() - globalRectPosX - 1;
   circDeltaMove.front() = 0.02f * localRectPosX / sqrtf(1.25f * localRectPosX * localRectPosX - localRectPosX + 1);
   circDeltaMove.back() = 0.02f * (1 - 0.5f * localRectPosX) / sqrtf(1.25f * localRectPosX * localRectPosX - localRectPosX + 1);
  }

  else if (circPos.front() - globalRectPosX < 1)
  {
   localRectPosX = (circPos.front() - globalRectPosX) - 1;
   circDeltaMove.front() = 0.02f * localRectPosX / sqrtf(1.25f * localRectPosX * localRectPosX + localRectPosX + 1);
   circDeltaMove.back() = 0.02f * (1 + 0.5f * localRectPosX) / sqrtf(1.25f * localRectPosX * localRectPosX + localRectPosX + 1);
  }
  numCollidedBricks.clear();
 }
        [...]
}
Finally, computeCirclePosition deals with ball-brick collisions using the following function:
void computeCirclePosition(vector<float>& circDeltaMove)
{
    [...]

     checkCollision(numBlocksX, numBlocksY, verticalSpace);

    [...]
}
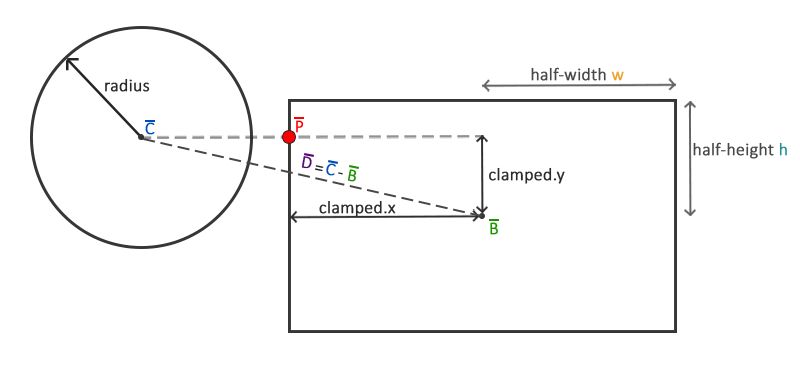
- Calculate the difference vector between the two objects' centers.
- Clamp the above vector to the rectangle's half-extents (width / 2, height / 2). This produces the point P in the above diagram, which is the closest point on the quad to the circle, and ensures that P always remains on the rectangle's perimeter. Such a clamping function can be coded like so:
- Calculate the distance between P and the circle's center. If that value is less than the radius, then there has been a successful collision.
float clamp(float value, float min, float max)
{
 return fmaxf(min, fminf(max, value));
}
Lastly, the ball velocity needs to be updated correctly after a collision occurs. More specifically, if it hits the top or bottom side of a brick, the y-velocity needs to be inverted, while a hit on the left or right sides should result in an x-velocity reversal. To correctly determine what side of the block our ball slams into, we can take the dot product between the so-called ballDistance vector (C - P) and four separate vectors describing the cardinal directions - north (0, 1), south (0, -1), west (-1, 0), and east (1, 0). The dot product that returns the highest value will then be the vector's direction (since the operator returns increasingly larger values the closer to parallel two vectors are), and subsequently what brick side the ball collided with. The code procedure looks like this:
void vectorDirection(vector<float>& target)
{
 float max = 0;
 float dotProduct;
 for (int i = 0; i < 4; ++i)
 {
  dotProduct = target.front() * compass[i][0] + target.back() * compass[i][1];
  if (dotProduct > max)
  {
   max = dotProduct;
   ballDirection = compass[i];
  }
 }
}
void checkCollision(float numBlocksX, float numBlocksY, int verticalSpace)
{
 if (numBlocksX != 0 && numBlocksY != 0)
 {
  int ii = 0;
  vector<float> blockCenter; //center point for each block in world space
  vector<float> ballDistance; //initially the distance between the ball and block centers. Later used as the distance between the ball center and closest point on the block
  vector<float> clamped; //the the vector defining the closest point on the block, which is not centered upon the block itself
  vector<float> closest; //the closest point on the block to the ball, which is now centered on its respective block
  for (float i = 10 - verticalSpace * deltaNumBlocksY; i < 10; i += deltaNumBlocksY)
  {
   for (float j = 0; j < 10; j += deltaNumBlocksX)
   {
    ++ii;
    blockCenter = { j + (5 / numBlocksX), i + (5 / numBlocksY) };
    ballDistance = {circPos.front() - blockCenter.front(), circPos.back() - blockCenter.back()};
    clamped = { clamp(ballDistance.front(), -(5 / numBlocksX), (5 / numBlocksX)) , clamp(ballDistance.back(), -(5 / numBlocksY), (5 / numBlocksY)) };
    closest = {blockCenter.front() + clamped.front(), blockCenter.back() + clamped.back() };
    ballDistance = { closest.front() - circPos.front(), closest.back() - circPos.back() };
    float actualDistance = sqrtf(ballDistance.front() * ballDistance.front() + ballDistance.back() * ballDistance.back());
    float reposition = radius - actualDistance;
    if (actualDistance < radius)
    {
     vectorDirection(ballDistance);
     if (activeStatus[ii] == true)
     {
      --numRemainingBlocks;
      numCollidedBricks.push_back(j + i * numBlocksY);
      if (ballDirection == vector<float> {0, 1} || ballDirection == vector<float> {0, -1})
      {
       if (numCollidedBricks.size() == 2 && abs((int)numCollidedBricks.front() - (int)numCollidedBricks.back()) == 1) circDeltaMove.back() *= 1;
       else circDeltaMove.back() *= -1;
       if (ballDirection == vector<float> {0, 1})
       {
        circPos.back() -= reposition;
       }
       else
       {
        circPos.back() += reposition;
       }
      }

      if (ballDirection == vector<float> {1, 0} || ballDirection == vector<float> {-1, 0})
      {
       if (numCollidedBricks.size() == 2 && abs((int)numCollidedBricks.front() - (int)numCollidedBricks.back()) == numBlocksX) circDeltaMove.front() *= 1;
       else circDeltaMove.front() *= -1;
       if (ballDirection == vector<float> {1, 0})
       {
        circPos.front() += reposition;
       }
       else
       {
        circPos.front() += reposition;
       }
      }
     }
     activeStatus[ii] = false;
    }
   }
  }
 }
}
if (numCollidedBricks.size() == 2 && abs((int)numCollidedBricks.front() - (int)numCollidedBricks.back()) == 1) circDeltaMove.back() *= 1;
if (numCollidedBricks.size() == 2 && abs((int)numCollidedBricks.front() - (int)numCollidedBricks.back()) == numBlocksX) circDeltaMove.front() *= 1;
Finally, we add a few more lines of code that increment the ball's position by circDeltaMove, thus advancing it through space:
void computeCirclePosition(vector<float>& circDeltaMove)
{
    [...]
    //alter ball velocity/multiple-brick collision logic
    if (numCollidedBricks.size() > 2) numCollidedBricks.clear();
    circPos.front() += circDeltaMove.front();
    circPos.back() += circDeltaMove.back();
}
Winning the Game:
If all the bricks in the level are destroyed, the game is stopped and a win message is displayed:

void winGame()
{
 if (start == true && numRemainingBlocks == 0)
 {
  MessageBox(NULL, L"Level 1 Complete\nThanks for playing!", L"Breakout", MB_OK | MB_ICONASTERISK);
  start = false;
  exit(0);
 }
}
Keyboard Input:
The last portion of the game that needs to be discussed is user input. The so-called idle function takes care of this like so:
void idle(int)
{
 glutIgnoreKeyRepeat(1);
 glutKeyboardFunc(startAndResetGame);
 glutSpecialFunc(pressKey);
 glutSpecialUpFunc(releaseKey);
 glutPostRedisplay();
 glutTimerFunc(1000 / FPS, idle, 0);
}
Start and Reset the Game:
startAndResetGame utilizes ASCII characters to allow the player to begin playing the game and resetting it at will. The function looks like this:
void startAndResetGame(unsigned char key, int x, int y)
{
 if (start == false)
 {
  if (key == 32)
  {
   circDeltaMove = vector<float>{ 0.01f * (float)randomNumber(-20, 20), 0.2f };
   circDeltaMove = vector<float>{ 0.02f * circDeltaMove.front() / sqrt(circDeltaMove.front() * circDeltaMove.front() + circDeltaMove.back() * circDeltaMove.back()) , 0.02f * circDeltaMove.back() / sqrt(circDeltaMove.front() * circDeltaMove.front() + circDeltaMove.back() * circDeltaMove.back()) };
   start = true;
  }
 }

 if (key == 27) exit(0);
 if (key == 82 || key == 114)
 {
  unsigned int ii = 0;
  globalRectPosX = 4.5f;
  circPos = { globalRectPosX + 1, radius + 1.2f };
  circDeltaMove = { 0, 0 };
  for (float i = 10 - verticalSpace * deltaNumBlocksY; i < 10; i += deltaNumBlocksY)
  {
   for (float j = 0; j < 10; j += deltaNumBlocksX)
   {
    ++ii;
    activeStatus[ii] = true;
   }
  }
numRemainingBlocks = numBlocksX * verticalSpace;
                numCollidedBricks.clear();
  start = false;
 }
}
int randomNumber(int min, int max)
{
 return min + rand() % (max - min + 1);
}
Translating the Paddle:
Earlier it was mentioned that translating the paddle was accomplished by adding the rectDeltaMove parameter to the platform position, which in turn was altered based on keyboard input. Here is the code that does just that:
void pressKey(int key, int x, int y)
{
 if (start == true)
 {
  switch (key)
  {
  case GLUT_KEY_RIGHT:
   rectDeltaMove = 0.35f;
   break;
  case GLUT_KEY_LEFT:
   rectDeltaMove = -0.35f;
   break;
  }
 }
}

void releaseKey(int key, int x, int y)
{
 if (start == true)
 {
  switch (key)
  {
  case GLUT_KEY_RIGHT:
  case GLUT_KEY_LEFT:
   rectDeltaMove = 0;
   break;
  }
 }
}
And that concludes the procedural, messy, deprecated first version of Breakout! Now we will move on to the object-oriented version and compare the differences between the two.
Version 2: Object-Oriented
On the second run of coding Breakout, there were a few aspects I wanted to work on/redesign. One was to shift the program's focus towards creating so-called "game-objects" that would store an object's core parameters and initialize/draw itself. This one container could then be utilized to create the ball, bricks, and paddle, thereby simplifying the rendering process. I also wanted to further explore modern OpenGL techniques for drawing, texturing, and coloring objects on-screen, which would involve learning about shader programs, vertex buffer/array objects, etc. in order to successfully implement those methods, in addition to cleaning up my code and keeping everything more organized. I found this incredible OpenGL learning source/tutorial here, which proved to be very useful in getting me up to speed on the information necessary to write the entire program (and in providing informative collision diagrams and textures I so graciously stole:) ; but in all seriousness, all credit for them goes to the author). With that out of the way, let's jump into the actual code!
Initial Setup
Game Class
Before getting our hands dirty with coding the game, a rudimentary framework needs to be put in place to help keep everything clean and organized. This can be done by creating a Game class to hold all initialization, update, and rendering functions alongside important parameters like the game level size, paddle position, etc. The class looks like this:
class Game
{
public:
 //game state and initial conditions
 GameState State;
 GLboolean Start = GL_FALSE;
 GLuint Width, Height, NumBlocksX, NumBlocksY, VerticalSpace;
 glm::vec2 PLAYER_SIZE;
 glm::vec2 INITIAL_BALL_VELOCITY;
 GLfloat PLAYER_VELOCITY, BALL_RADIUS;
 //constructor/Destructor
 Game(GLuint width, GLuint height, GLuint numBlocksX, GLuint numBlocksY, GLuint verticalSpace);
 ~Game();
 //initialize game state (load all shaders/textures/levels)
 void Init();
 //gameLoop
 void ProcessInput(GLfloat velocity);
 void Update(GLfloat dt, GLboolean start);
 void Render();
 void DoCollisions();
 void ResetLevel();
 void ResetPlayer();
 void WinGame();
};
enum GameState
{
 GAME_ACTIVE,
 GAME_WIN
};
Utility Classes
In addition to the above game class, a few extra utility classes will be written/added to handle various loading/managing tasks:
- A shader class that generates/compiles shaders from two strings (or three if a geometry shader is present). It will also include helpful functions to quickly set uniform values.
- A texture class that generates a 2D texture from a byte array and inputted dimensions.
- A resource manager to streamline the texture/shader-loading processes.
- stb_image for converting typical image formats (.png, .jpg, etc.) to usable byte arrays, just like in the previous version.
While I won't present each class here (to help shorten an already-long a bit), they will be available in the source code files along with some short annotations describing what the programs are doing.
Rendering Objects
Shader Programs
To draw all of the necessary game objects a separate sprite renderer will be coded to pass vertex data to the GPU before transforming it as required. This transformation is handled by the vertex shader:
#version 400
layout (location = 0) in vec2 vertex;
layout (location = 1) in vec2 aTexCoord;

out vec2 TexCoords;

uniform mat4 model;
uniform mat4 projection;

void main()
{
 TexCoords = vec2(aTexCoord.x, aTexCoord.y);
 gl_Position = projection * model * vec4(vertex.xy, 0.0f, 1.0f);//vec4(vertex.xy, 0, 1);
}
void Game::Init()
{
    [...]
    glm::mat4 projection = glm::ortho(0.0f, static_cast<GLfloat>(this->Width), static_cast<GLfloat>(this->Height), 0.0f, -1.0f, 1.0f);
    [...]
}
In addition to the vertex shader, a fragment shader needs to be written to correctly set the object colors/textures:
#version 400
in vec2 TexCoords;
out vec4 color;

uniform sampler2D image;
uniform vec3 spriteColor;

void main()
{
   color = vec4(spriteColor, 1) * texture(image, TexCoords);
}
Sprite Render Class
Next a spriteRenderer class is defined that can draw objects via a single function:class SpriteRenderer { public: //constructor (initialize shaders/shapes) SpriteRenderer(Shader &shader); //destructor ~SpriteRenderer(); //render a quad with proper texturing and coloring void DrawSprite(Texture2D &texture, glm::vec2 position, glm::vec2 size = glm::vec2(10, 10), GLfloat rotate = 0, glm::vec3 color = glm::vec3(1)); private: //render state Shader shader; GLuint quadVAO; //initialize and configure the quad's buffer and vertex attributes void initRenderData(); };
The initRenderData() function will be discussed first:
GLuint indices[6] = {1, 3, 0, 1, 2, 3};
void SpriteRenderer::initRenderData()
{
 glewInit();

 GLuint VBO, EBO;

 float vertices[] =
 {
  0.0f, 0.0f, 0.0f, 0.0f, //bottom left
  0.0f, 1.0f, 0.0f, 1.0f, //top left
  1.0f, 1.0f, 1.0f, 1.0f, //top right
  1.0f, 0.0f, 1.0f, 0.0f  //bottom right
 };

 glGenVertexArrays(1, &this->quadVAO);
 glGenBuffers(1, &VBO);
 glGenBuffers(1, &EBO);

 glBindBuffer(GL_ARRAY_BUFFER, VBO);
 glBufferData(GL_ARRAY_BUFFER, sizeof(vertices), vertices, GL_STATIC_DRAW);
 glBindBuffer(GL_ELEMENT_ARRAY_BUFFER, EBO);
 glBufferData(GL_ELEMENT_ARRAY_BUFFER, sizeof(indices), indices, GL_STATIC_DRAW);

 glBindVertexArray(this->quadVAO);
 glVertexAttribPointer(0, 2, GL_FLOAT, GL_FALSE, 4 * sizeof(GL_FLOAT), (void*)0);
 glEnableVertexAttribArray(0);
 glVertexAttribPointer(1, 2, GL_FLOAT, GL_FALSE, 4 * sizeof(GL_FLOAT), (void*)(2 * sizeof(GL_FLOAT)));
 glEnableVertexAttribArray(1);
 glBindBuffer(GL_ARRAY_BUFFER, 0);
 glBindBuffer(GL_ELEMENT_ARRAY_BUFFER, 0);
}
Using the above private function we can draw the sprites by using the relevant shader, configuring a model matrix, and setting the necessary uniforms. Note the transformation order - because it is usually advised to first scale, then rotate, and finally translate an object, and matrix multiplication goes from right to left, we must perform the transformations in reverse order, i.e. translate, rotate, and then scale:
void SpriteRenderer::DrawSprite(Texture2D &texture, glm::vec2 position, glm::vec2 size, GLfloat rotate, glm::vec3 color)
{
 this->shader.Use();
 glm::mat4 model;

 model = glm::mat4(1.0f);
 model = glm::translate(model, glm::vec3(position, 0));

 model = glm::translate(model, glm::vec3(0.5f * size.x, 0.5f * size.y, 0));
 model = glm::rotate(model, rotate, glm::vec3(0, 0, 1.0f));
 model = glm::translate(model, glm::vec3(-0.5f * size.x, -0.5f * size.y, 0));

 model = glm::scale(model, glm::vec3(size, 1.0f));

 this->shader.SetMatrix4("model", model);
 this->shader.SetVector3f("spriteColor", color);

 glActiveTexture(GL_TEXTURE0);
 texture.Bind();

 glBindVertexArray(this->quadVAO);
 glDrawElements(GL_TRIANGLES, 6, GL_UNSIGNED_INT, (void*)indices);
 glBindVertexArray(0);
}
With the sprite renderer now being complete, we can move on to creating the game objects - the basis for OOP.
The Game Objects and Game Level
The Bricks
In this section we will define the so-called game object, a class that acts as the base representation for all in-game objects. The class will store important information like ID, position, size, velocity, color, active state, and texture, along with an initialization and drawing function that allows the object to instantiate itself:
class GameObject
{
public:
 GLuint LevelWidth, LevelHeight, NumBlocksX, NumBlocksY, VerticalSpace;
 glm::vec2 Position, Size, Velocity;
 glm::vec3 Color;
 GLfloat Rotation, ID;
 GLboolean IsActive;
 Texture2D Sprite;
 GameObject();
 GameObject(GLfloat ID, glm::vec2 pos, glm::vec2 size, Texture2D sprite, glm::vec3 color = glm::vec3(1.0f), glm::vec2 velocity = glm::vec2(0.0f, 0.0f));
 virtual void Draw(SpriteRenderer &renderer);
 void Init(GLuint levelWidth, GLuint levelHeight, GLuint numBlocksX, GLuint numBlocksY, GLuint verticalSpace);
 std::vector<GameObject> Bricks;
};
void GameObject::Init(GLuint levelWidth, GLuint levelHeight, GLuint numBlocksX, GLuint numBlocksY, GLuint verticalSpace)
{
 int hh = 9 - verticalSpace;
 int ii = 0;
 int jj = -1;
 int kk = 0;
 int ll = 1;
 int mm = 2;

 GLfloat blockSizeX = (GLfloat)levelWidth / numBlocksX;
 GLfloat blockSizeY = (GLfloat)levelHeight / numBlocksY;

 glm::vec3 color;

 for (GLuint y = 0; y < verticalSpace; ++y)
 {
  ++hh;
  for (GLuint x = 0; x < numBlocksX; ++x)
  {
   ++ii;
   if (jj <= (int)numBlocksX - 2) ++jj;
   else jj = 0;

   if (numBlocksX % 3 == 0)
   {
    int ii = (10 - jj) + hh * numBlocksX;
    if (kk < 3)
    {
     if (ii % 3 == kk) color = glm::vec3(0, 1, 0);
    }

    else kk = 0;
    if (ll < 3)
    {
     if (ii % 3 == ll) color = glm::vec3(1, 0, 0);
    }

    else ll = 0;

    if (mm < 3)
    {
     if (ii % 3 == mm) color = glm::vec3(0, 0, 1);
    }

    else mm = 0;
   }

   else if (numBlocksX % 3 == 1)
   {
    if (ii % 3 == 0) color = glm::vec3(0, 0, 1);
    else if (ii % 3 == 1) color = glm::vec3(1, 0, 0);
    else if (ii % 3 == 2) color = glm::vec3(0, 1, 0);
   }

   else if (numBlocksX % 3 == 2)
   {
    int ii = (10 - jj) + hh * numBlocksX;
    if (ii % 3 == 0) color = glm::vec3(0, 0, 1);
    else if (ii % 3 == 1) color = glm::vec3(0, 1, 0);
    else if (ii % 3 == 2) color = glm::vec3(1, 0, 0);
   }

   glm::vec2 pos(blockSizeX * x, blockSizeY * y);
   glm::vec2 size(blockSizeX, blockSizeY);
   GameObject obj(jj, pos, size, ResourceManager::GetTexture("block"), color);
   obj.IsActive = GL_TRUE;
   this->Bricks.push_back(obj);
  }
  ++kk;
  ++ll;
  ++mm;
 }
}
In addition to this initialization function, the game object class also hosts a constructor and draw function:
GameObject::GameObject()
 :ID(0), Position(0, 0), Size(1, 1), Velocity(0.0f), Color(1.0f), Rotation(0.0f), Sprite(), IsActive(true){ }

GameObject::GameObject(GLfloat ID, glm::vec2 pos, glm::vec2 size, Texture2D sprite, glm::vec3 color, glm::vec2 velocity)
 :ID(ID), Position(pos), Size(size), Velocity(velocity), Color(color), Rotation(0.0f), Sprite(sprite), IsActive(true){}

void GameObject::Draw(SpriteRenderer &renderer)
{
 renderer.DrawSprite(this->Sprite, this->Position, this->Size, this->Rotation, this->Color);
}
The Game Level
Now that we have the ability to generate bricks, we need to instantiate them correctly into the game level itself. A GameLevel class will thus be created to do just that, along with taking care of a few other auxiliary tasks:
class GameLevel
{
public:
 GameLevel() {}
 GameObject object;
 void Load(GLuint levelWidth, GLuint levelHeight, GLuint numBlocksX, GLuint numBlocksY, GLuint verticalSpace);
 void Draw(SpriteRenderer &renderer);
 GLboolean IsCompleted();
};
void GameLevel::Load(GLuint levelWidth, GLuint levelHeight, GLuint numBlocksX, GLuint numBlocksY, GLuint verticalSpace)
{
 this->object.Bricks.clear();
 this->object.Init(levelWidth, levelHeight, numBlocksX, numBlocksY, verticalSpace);
}

void GameLevel::Draw(SpriteRenderer &renderer)
{
 for (GameObject &tile : this->object.Bricks)
  if (tile.IsActive)
   tile.Draw(renderer);
}

GLboolean GameLevel::IsCompleted()
{
 for (GameObject &tile : this->object.Bricks)
  if (tile.IsActive)
   return GL_FALSE;
 return GL_TRUE;
}
GameLevel one;
SpriteRenderer *Renderer

void Game::Init()
{
    [...]
    ResourceManager::LoadTexture("paddle.png" , GL_TRUE, "paddle");
    ResourceManager::LoadTexture(" awesomeface_01.png", GL_TRUE, "face");
    ResourceManager::LoadTexture( "block.png", GL_FALSE, "block");
    ResourceManager::LoadTexture( "background.jpg", GL_FALSE, "background");

    one.Load(this->Width, this->Height, this->NumBlocksX, this->NumBlocksY, this->VerticalSpace);

}
void Game::Render()
{
 if (this->State == GAME_ACTIVE)
 {
  Texture2D backgroundTexture = ResourceManager::GetTexture("background");
  Renderer->DrawSprite(backgroundTexture, glm::vec2(0, 0), glm::vec2(this->Width, this->Height), 0);
  one.Draw(*Renderer);
 }
}
The Paddle
The paddle will be created as a game object in the game class:
GameObject *Player;

void Game::Init()
{
    [...]
    glm::vec2 playerPos = glm::vec2(0.5f * this->Width - 0.5f * PLAYER_SIZE.x, 0.9f * this->Height - PLAYER_SIZE.y);
    Player = new GameObject(0, playerPos, PLAYER_SIZE, ResourceManager::GetTexture("paddle"));
    [...]
}
class Game
{
public:
    [...]
    glm::vec2 PLAYER_SIZE;
    GLfloat PLAYER_VELOCITY;
    [...]
}
Player->Draw(*Renderer);
void Game::ProcessInput(GLfloat velocity)
{
 if (this->State == GAME_ACTIVE)
 {
  if (Player->Position.x > -0.1f && Player->Position.x < this->Width - 0.99f * Player->Size.x) Player->Position.x += velocity;
  if (Player->Position.x <= -0.1f && GLUT_KEY_LEFT) Player->Position.x += 0;
  if (Player->Position.x <= -0.1f && GLUT_KEY_RIGHT) Player->Position.x -= velocity;
  if (Player->Position.x >= this->Width - 0.99f * Player->Size.x && GLUT_KEY_RIGHT) Player->Position.x += 0;
  if (Player->Position.x >= this->Width - 0.99f * Player->Size.x && GLUT_KEY_LEFT) Player->Position.x -= velocity;
 }
}
BallObject Class
While the above GameObject class is sufficient for rendering the paddle and bricks, the ball is a little trickier because of its circular shape and unique movement patterns. For those reasons a GameObject subclass called BallObject will be constructed:
class BallObject : public GameObject
{
public:
 GLfloat Radius;
 BallObject();
 BallObject(glm::vec2 pos, GLfloat radius, glm::vec2 velocity, Texture2D sprite);
 glm::vec2 Move(GLfloat dt, GLboolean start, GLuint window_width);
 void Reset(glm::vec2 position, glm::vec2 velocity);
};
glm::vec2 BallObject::Move(GLfloat dt, GLboolean start, GLuint window_width)
{
 if (start == GL_TRUE)
 {
  this->Position += this->Velocity * dt;
  if (this->Position.x <= 0)
  {
   this->Velocity.x = -this->Velocity.x;
   this->Position.x = 0;
  }

  else if (this->Position.x + this->Size.x >= window_width)
  {
   this->Velocity.x = -this->Velocity.x;
   this->Position.x = window_width - this->Size.x;
  }

  if (this->Position.y <= 0)
  {
   this->Velocity.y = -this->Velocity.y;
   this->Position.y = 0;
  }
 }

 return this->Position;
}
The Reset() function simply resets the ball's position and velocity to its original condition:
void BallObject::Reset(glm::vec2 position, glm::vec2 velocity)
{
 this->Position = position;
 this->Velocity = velocity;
}
void Game::Init()
{
    glm::vec2 ballPos = playerPos + glm::vec2(PLAYER_SIZE.x / 2 - this->BALL_RADIUS, -this->BALL_RADIUS * 2);
    Ball = new BallObject(ballPos, this->BALL_RADIUS, this->INITIAL_BALL_VELOCITY, ResourceManager::GetTexture("face"));
}
void Game::Render()
{
 if (this->State == GAME_ACTIVE)
 {
  [...]
  Ball->Draw(*Renderer);
                [...]
 }
}
void Game::Update(GLfloat dt, GLboolean start)
{
 for (int i = 0; i < 10; ++i)
  Ball->Move(dt, start, this->Width);
}
Collision Detection and Resolution
This topic was already covered extensively in the previous version, and none of the math will change here, so I won't talk about it too much again. The one thing I will say is that all of the relevant collision data (whether or not there was a hit, the ball's collision direction, and penetration vector) is stored as a tuple in the game class:
typedef std::tuple<GLboolean, Direction, glm::vec2> Collision;
Version Comparison
While it would be unfair to use these two programs as valid examples to compare object-oriented and procedural programming, considering the vast differences in code quality, organization, etc. present, I do think it would be instructive to summarize my overall thoughts and experiences in making this project come together.
One of the most striking features that I had some trouble getting accustomed to was actually rendering objects on-screen using modern techniques. The older methods, where I set each individual vertex/texture/color coordinate using glVertex2f, glTexCoord2f, and glColor3f, for example, was much more intuitive and simple-to-grasp than programming my own shaders, loading them into usable strings, passing them to VBOs (whose creation was a whole other deal), etc., especially for as small a project as this. After grappling with those ideas for a while I finally became more comfortable with them and see the benefit in their usage - scalability, flexibility in setting a wide variety of parameters, etc., features that would definitely become more important in larger projects.
In addition to this, organizing the game via game objects rather than procedures made more intuitive sense the farther I got into programming Breakout. Having these game object containers streamlined a wide variety of processes, from texturing to drawing to updating positions, that I had to previously do by hand in version 1. If I were working on a larger-scale game, where there are hundreds or thousands of different assets one needs to handle, my manual techniques certainly become overshadowed by OOP, even if I cleaned up the first version code and organized it similarly to the second.
Ultimately, both programming styles have their place and purpose, and I think it was important to explore and gain a better understanding of their functionalities, abilities, and overall structure.
Final Remarks and Future Projects
I would like to finish off this post with a few different project ideas I've been entertaining as of late, which I'll list below:- Rewrite the Navier-Stokes solver I implemented in Unity/C# using C++ and OpenGL.
- Eventually perform the necessary computations on the GPU instead of the CPU.
- A scramjet engine simulator using C++/OpenGL.
- Calculate temperatures, pressures, aerodynamic forces, etc. at different parts of the engine.
- Graphically display the engine design and relevant color gradient graphs of the above parameters.
- Allow the user to modify a wide variety of parameters, including the ambient air conditions, speed, interior engine design (inlet angles, nozzle size, etc.), etc.
- Dabble in Unreal Engine, possibly posting some mini-projects related to it.
- 2D universe simulator/game where the celestial bodies adhere to 2-dimensional orbital mechanics laws (such as gravity dropping off with the inverse of the distance rather than the distance squared).
I'll make another update as soon as I choose a project to tackle first and start working on developing the idea. Until then, thank you for reading this post, and I hope it was at least somewhat informative!
Game Builds/Source Code
Version 1 - Procedural-Oriented:
Version 2 - Object-Oriented:
No comments:
Post a Comment